Setting the Template Size
Sponsored link
Blogger Template Design: Tutorial 7
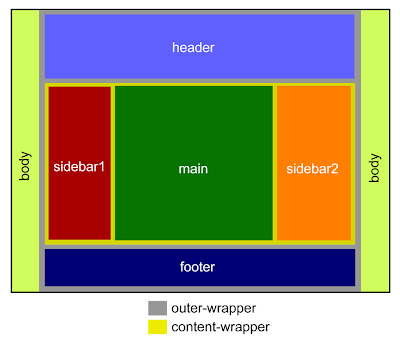
Setting the template size is probably one of the first things you need to do when starting to design a new template. The are two ways to set the size (basically the width) of a template:
To set a template width, you actually have to set the width of a few large containers. The most common containers to set the widths are:
In most of my newest templates, I also set the widths in the containers just inside some of the wrapper containers (which is redundant) to avoid some minor alignment bugs that may appear. The widths of these containers are set equal to the widths of their parent wrapper containers. These containers are:
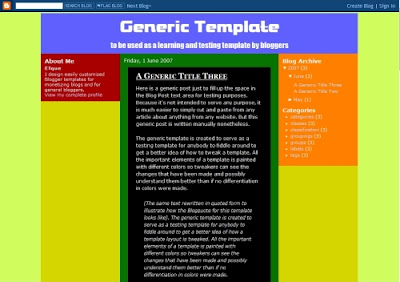
 Here is a sample code from the Generic Blogger Template showing you all the container widths that are set to make sure the template width is properly set (only the part that concerns the width-setting are shown). In this sample, the template width is set at 800 pizels.

The body is set with a command min-width = 800px, which means that the smallest width it should have is 800px. If it's set with a command width = 800px only, then the template width might shrink in some situation. Setting it with a min-width guarantees the smallest size it will take.
The next container just inside the body is the outer-wrapper. It's usually common to set it with a command width = 800px only. But as I've explained about my strictness in setting the width to avoid any alignment bugs, it's becoming my habit to always set the container to have a min-width and max-width of the same value so that the container size is exactly that size - it will not shrink or widen to any different value. Another thing about the outer-wrapper is that this is where you set the command to either place your template at the center of screen or float to the left of it. In this case, setting margin: 0 auto will float the template to the center. Just writing margin: 0 will float it to the left as a default position.
The next 3 large containers, the header-wrapper, the content-wrapper, and the footer-wrapper is usually set to be the same size; in this case it's 800px. In any case, they can be set smaller than the outer-wrapper width but not any bigger than that because the outer-wrapper 'wraps' these 3 containers inside it. Another thing, if you add left and right borders, then you'll increase the width, and the outer-wrapper will just cut out whatever that's bigger than itself on the right side. So, if you do add borders, say 2px left and 2px right for the header-wrapper, then you have to set the header-wrapper width to be 796px so that the total would be 796+2+2 = 800px. The same goes for all the other containers.
The last 3 containers are the 2 sidebars and the main-wrapper. Because they sit side by side, you have to make sure the total width = 800px or less, but certainly not more. In this case, I set the main-wrapper to be 400px and both the 2 sidebars to be 200px. But because I added padding of 10px left and right of each sidebars, which pushes the sidebar border outward, I'd have to reduce the sidebar width to be 180px so that the total sum after adding the pads would be 200px. You have to note that the largest sidebar container is the sidebar-wrapper (not just the sidebar). I could have set the width of the sidebar-wrapper instead of the sidebar, but I prefer to set the sidebar width because sometimes I may set the 2 sidebars to have different widths. But, this is all just a matter of personal style; other template designers may have different way of setting this sidebar widths. As long as it works, that's all that matters.
Setting a fluid template size:
To set a template with width that changes with browser or screen size, please refer to W3Schools Tutorials for more details. In my templates, I haven't made any such templates and so my experience in setting a fluid sized template is not much. Once I have more experience in this, I'll post the tutorials on it.
- Tutorial 6: Using the Generic Blogger Template
- Tutorial 8: The Body Section of the Blogger Template Code
Setting the template size is probably one of the first things you need to do when starting to design a new template. The are two ways to set the size (basically the width) of a template:
- Setting the size to be fixed with a certain width, say 800 pixels.
- Setting the template to have a fluid size, which means the width changes with the browser or screen size.
To set a template width, you actually have to set the width of a few large containers. The most common containers to set the widths are:
- Body
- Outer-wrapper
- Header-wrapper
- Content-wrapper
- Footer-wrapper
- Main-wrapper
- Sidebar-wrapper*
- Footer-wrapper
In most of my newest templates, I also set the widths in the containers just inside some of the wrapper containers (which is redundant) to avoid some minor alignment bugs that may appear. The widths of these containers are set equal to the widths of their parent wrapper containers. These containers are:
- Header
- Main
 Here is a sample code from the Generic Blogger Template showing you all the container widths that are set to make sure the template width is properly set (only the part that concerns the width-setting are shown). In this sample, the template width is set at 800 pizels.
body {
min-width: 800px; }

#outer-wrapper {
margin: 0 auto;   /* to make the template lays in the screen center */
min-width: 800px;
max-width: 800px; }

#content-wrapper {
min-width: 800px;
max-width: 800px; }

#header-wrapper {
min-width: 800px;
max-width: 800px; }

#main-wrapper {
min-width: 400px;
max-width: 400px; }

.sidebar {
padding: 10px 10px 10px 10px;
min-width: 180px;
max-width: 180px; }

#sidebar1 {.....}
#sidebar2 {.....}

#footer-wrapper {
min-width: 800px;
max-width: 800px; }

The body is set with a command min-width = 800px, which means that the smallest width it should have is 800px. If it's set with a command width = 800px only, then the template width might shrink in some situation. Setting it with a min-width guarantees the smallest size it will take.
The next container just inside the body is the outer-wrapper. It's usually common to set it with a command width = 800px only. But as I've explained about my strictness in setting the width to avoid any alignment bugs, it's becoming my habit to always set the container to have a min-width and max-width of the same value so that the container size is exactly that size - it will not shrink or widen to any different value. Another thing about the outer-wrapper is that this is where you set the command to either place your template at the center of screen or float to the left of it. In this case, setting margin: 0 auto will float the template to the center. Just writing margin: 0 will float it to the left as a default position.
The next 3 large containers, the header-wrapper, the content-wrapper, and the footer-wrapper is usually set to be the same size; in this case it's 800px. In any case, they can be set smaller than the outer-wrapper width but not any bigger than that because the outer-wrapper 'wraps' these 3 containers inside it. Another thing, if you add left and right borders, then you'll increase the width, and the outer-wrapper will just cut out whatever that's bigger than itself on the right side. So, if you do add borders, say 2px left and 2px right for the header-wrapper, then you have to set the header-wrapper width to be 796px so that the total would be 796+2+2 = 800px. The same goes for all the other containers.
The last 3 containers are the 2 sidebars and the main-wrapper. Because they sit side by side, you have to make sure the total width = 800px or less, but certainly not more. In this case, I set the main-wrapper to be 400px and both the 2 sidebars to be 200px. But because I added padding of 10px left and right of each sidebars, which pushes the sidebar border outward, I'd have to reduce the sidebar width to be 180px so that the total sum after adding the pads would be 200px. You have to note that the largest sidebar container is the sidebar-wrapper (not just the sidebar). I could have set the width of the sidebar-wrapper instead of the sidebar, but I prefer to set the sidebar width because sometimes I may set the 2 sidebars to have different widths. But, this is all just a matter of personal style; other template designers may have different way of setting this sidebar widths. As long as it works, that's all that matters.
Setting a fluid template size:
To set a template with width that changes with browser or screen size, please refer to W3Schools Tutorials for more details. In my templates, I haven't made any such templates and so my experience in setting a fluid sized template is not much. Once I have more experience in this, I'll post the tutorials on it.
Labels: Make Template, Tutorial
Translate to:
0 Comments:
Previous Posts
- Tutorials on Blogger Template Design
- Using the Generic Blogger Template
- Common Containers and Elements in a Blogger Template
- Blogy-Ondas
- Setting the Properties of a Container
- The structure of CSS Styling Section
- The structure of a Blogger template code
- The structure of a Blogger template
- Blogger Template Design: Introduction
- Blogy Acuerdo


Post a Comment
Thanks for your comment.